Build Git Tagged Multi-Arch Docker Images with GitHub Actions
Automate building and pushing Docker images that support both AMD64 and ARM64 CPU architectures.
Prefer video? Here it is on YouTube.
If you’re not sure what Docker’s Buildx is or want to cover the basics on building multi-CPU architecture Docker images please check out this post and video.
This post will focus on the GitHub Actions and Docker Hub specifics. We’ll be using the free tier of both services.
If you plan to follow along, here’s a few things you’ll want to set up beforehand:
- Create a GitHub account (free plan is ok)
- Create a Docker Hub account (free plan is ok)
- Create a public or private GitHub repo
- Create a public or private Docker Hub repo
- Have a Docker image that you want to publish when git tags are pushed to that repo
We’re going to skim through some of the above steps if you’re not sure how to do them.
# Skimming a Few Set Up Steps
Since you’re reading this post I’m guessing you already have a GitHub account and at least one repo created to work with.
I’ll be using https://github.com/nickjj/webserver as a working example for this post.
As for the Docker Hub, after you create an account you can create a new repository. This is where your Docker images will live for that specific project. You’ll want to pop in a repo name and choose whether or not it’s public or private. Either option works for this case.
Lastly, if you don’t have a Docker image to build and use you can use this
very basic hello world Dockerfile:
FROM hello-world
Now you can run this locally docker image build . -t nickjj/hello-world which
will build and tag that image for your Docker Hub account. Replace nickjj
with your Docker Hub account.
# Covering the GitHub Actions Config
Create this file in your git repo in .github/workflows/docker-publish.yml,
feel free to remove the comments. I’ve annotated the file with extra details
for this post.
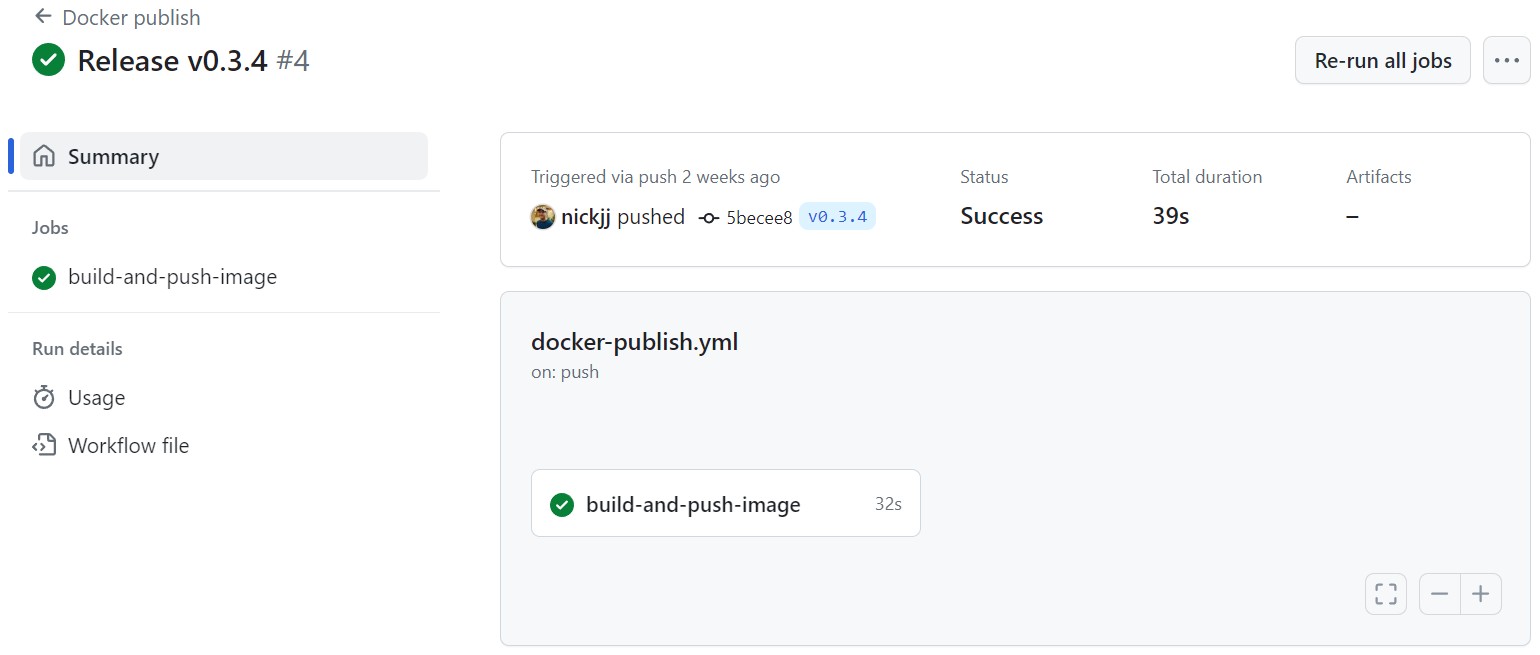
Here’s an example of this file in my webserver project without the comments. Here’s a screenshot of one of the builds, notice the names that appear in the UI based on the config below.
# This can be named anything, it'll show up in the GitHub Actions UI.
name: "Docker publish"

# This workflow will only run when git tags are pushed that start with `v*`,
# meaning `v123` or `v1.0.0` will work but `0.1.0` won't, if you don't want to
# prefix tags with `v` then remove the `v`.
on:
  push:
    tags:
      - "v*"

jobs:
  # This can also be named anything, it'll show up in the GitHub Actions UI.
  build-and-push-image:
    # Let's use the latest Ubuntu version for our CI environment.
    runs-on: "ubuntu-latest"

    # Most of the steps are things we covered in the Buildx basics post.
    # They are just wrapped up into GitHub Actions instead of being raw shell
    # commands we run manually.
    steps:
      # Literally git checkout the code, this is standard in most actions.
      - name: "Checkout"
        uses: "actions/checkout@v4"

      # Allow the CI environment to emulate multiple CPU architectures.
      - name: "Set up QEMU"
        uses: "docker/setup-qemu-action@v3"

      # Create and configure the Buildx context.
      - name: "Set up Docker Buildx"
        uses: "docker/setup-buildx-action@v3"

      # Log into the Docker Hub (more on this in a bit).
      - name: "Login to Docker Hub"
        uses: "docker/login-action@v3"
        with:
          username: "${{ secrets.DOCKERHUB_USERNAME }}"
          password: "${{ secrets.DOCKERHUB_TOKEN }}"

      # Push images for X platforms to the Docker Hub (more on this in a bit).
      - name: "Build and push image tags"
        uses: "docker/build-push-action@v5"
        with:
          context: "."
          platforms: "linux/amd64,linux/arm64"
          push: true
          tags: |
            "${{ github.repository }}:latest"
            "${{ github.repository }}:${{ github.ref_name }}"
As you can see the config file is pretty concise. Most of the individual actions have additional configuration you can optionally supply. If you Google for them you can find their respective git repos. For example here’s the docker/build-push-action.
Let’s go over the steps related to logging into the Docker Hub and pushing image tags.
Login to Docker Hub
Technically this action supports more than just the Docker Hub for registry access. You can view its documentation for details. When you use the Docker Hub it becomes pretty painless to configure since we can use mostly the defaults.
We’ll need to do a few things before this step will work for us:
- Create a personal access token on the Docker Hub
- This is how GitHub Actions will use your Docker Hub account
- This is more secure than using your real Docker Hub password
- You can revoke the token without needing to re-roll your real password
- Scope it for
read,writeanddeleteif you want to support all of those behaviors- In this post we’ll focus on actions that require
writeaccess - If you delete a git tag you could have a separate action
deletethe image tag
- In this post we’ll focus on actions that require
- Create GitHub secrets that are accessible through GitHub Actions
- This is under your repo Settings -> Security -> Secrets and variables -> Actions
- Create a new secret
DOCKERHUB_USERNAMEand use your user name- This isn’t really a secret but it’s convenient to have it next to your token
- Create a new secret
DOCKERHUB_TOKENand paste in your personal access token
That’s it! With that configured you can now login to the Docker Hub in a secure way.
Build and Push Image Tags
If you’re ok with the config as is then there’s nothing to manually configure here.
It will look for and build a Dockerfile in the root of your project and build
both AMD64 and ARM64 images then push them to the Docker Hub. This is very
similar to the Buildx commands we ran in the previous post.
As for the tags, we’re reaching in and reading special
variables
that GitHub makes available to use. Referencing github.repository in my case
will be nickjj/webserver as well as github.ref_name which when pushing tags
will be the exact tag name such as v0.3.4.
This avoids us having to manually input the tag name. Yay for automation.
It’s worth pointing out I’m using github.repository because my GitHub repo
and Docker Hub repo are both named nickjj/webserver. You’ll want to ensure
that the value matches your Docker Hub repo. If it’s not the same as GitHub
then you can use whatever it is for the Docker Hub.
# Testing It Out
After committing your code locally you can run git tag v1.0.0 and push it all
up with git push origin main --tags. Our “Docker publish” workflow will start
due to the tag matching v* and shortly after that everything should get built
and pushed.
You can view the status of your workflow under the “Actions” tab in your repo, here’s mine for the webserver project https://github.com/nickjj/webserver/actions.
If it worked you’ll be able to find your Docker images in your Docker Hub repo, here’s mine for the webserver project https://hub.docker.com/r/nickjj/webserver/tags.
The video below covers everything in this post.
# Demo Video
References
- https://github.com/docker/compose/releases
- https://docs.docker.com/compose/install/linux/#install-the-plugin-manually
Timestamps
- 1:37 – GitHub Action basics
- 2:36 – Only running it when git tags are pushed
- 4:11 – High level overview of the job’s steps
- 5:22 – A few basic preparation steps
- 6:51 – Logging into the Docker Hub with a personal token
- 11:17 – Building and pushing our images
- 14:51 – Checking out the raw commands that were run
Did you use this set up to push Docker images? Let us know below.