Build Multi-CPU Architecture Docker Images with Buildx
This can be handy to support both AMD64 and ARM64 CPU architectures. Build images for X platforms with one command.
Prefer video? Here it is on YouTube.
The main use case here is you might want to have a single Dockerfile that gets built into an image that supports more than 1 CPU architecture.
For example, maybe you have a 64-bit Intel or AMD based CPU.
Alternatively maybe you have Apple Silicon (Mx, etc.), a Raspberry Pi or you’re using a cloud provider that supports ARM based CPUs. These are classified as ARM64 although technically there’s a few variants of ARM.
There’s pros and cons for both CPU architectures but that goes beyond the scope of this post. Feel free to research that if you’re interested.
In any case Docker’s buildx command lets us build images that support
multiple platforms. The best part about it is we don’t need to modify our
Dockerfile. If you never heard of buildx before but you have an existing
Dockerfile that you’ve built with build, it should work without any issues.
# What is Buildx?
Buildx is a Docker plugin that’s installed by default with Docker Desktop. It’s
also installed by default on native Linux without DD if you install Docker with
https://get.docker.com. If not you can install it with the
docker-buildx-plugin package in your distro’s package manager.
It gets exposed to you as a docker buildx command in a similar way that
docker compose is available to you. Both are Docker plugins.
You can run docker buildx ls to see which builder is currently in use.
Chances are you have at least a default context with a status of running.
Here’s a fun fact. You’ve been using buildx all this time!
When you run docker build, it’s really using buildx under the hood. That
became the default on Linux with Docker Engine 23.0 (Feb 2023) but Buildx has
existed since all the way back to Docker Engine 19.0 (July 2019), you might
remember based on seeing a different output style when running docker build
commands.
Although, at least at the time of making this post the default builder doesn’t support building multi-platform images but all we have to do is create a new one with a different driver to get that support.
# Creating a New Builder
Let’s make a new builder just to see how it works. We’ll be deleting it at end of this post but you can choose to keep it around for personal use too.
docker buildx create --driver-opt network=host --use --name multi-arch
docker buildx createcreates a new build context--driver-opt network=hostmay or may not need to be set in your case, I noticed with Docker installed inside of WSL 2 I wasn’t able to access the network without this flag--useautomatically switches to this new context we’re creating--name multi-archnames this context, we can name it anything we want and if it were left undefined Docker would randomly generate a name
You should see something like this now:
$ docker buildx ls
NAME/NODE     DRIVER/ENDPOINT             STATUS   BUILDKIT PLATFORMS
multi-arch *  docker-container
  multi-arch0 unix:///var/run/docker.sock inactive
default       docker
  default     default                     running  v0.12.5  linux/amd64, ...
# Inspect Builders
Let’s compare the output of both the default builder and the one we just created to see the differences and also uncover why the default builder doesn’t support multi-archs by default. It defaults to your machine’s architecture instead.
Keep in mind the outputs below may change over time. This is based on running Docker Engine 25.0 which was released in early 2024.
$ docker buildx inspect default
Name:          default
Driver:        docker
Last Activity: 2024-02-10 14:14:39 +0000 UTC

Nodes:
Name:      default
Endpoint:  default
Status:    running
Buildkit:  v0.12.5
Platforms: linux/amd64, linux/amd64/v2, linux/amd64/v3, linux/386
Labels:
 org.mobyproject.buildkit.worker.moby.host-gateway-ip: 172.17.0.1
$ docker buildx inspect multi-arch
Name:          multi-arch
Driver:        docker-container
Last Activity: 2024-02-10 14:33:31 +0000 UTC

Nodes:
Name:           multi-arch0
Endpoint:       unix:///var/run/docker.sock
Driver Options: network="host"
Status:         inactive
The driver property is important to note. Notice how the default driver is
docker but the one we created is docker-container. The docker-container
driver allows for building multi-arch images across different platforms.
This works because that driver takes advantage of QEMU emulation. This gives us a way to seamlessly build different images for different platforms. Normally you don’t have to think at this low level, everything “just works” but it’s nice to know how it works at a high level.
# Building and Inspect Images with Buildx
Feel free to build images from whatever Docker projects you have. I have plenty of example Docker web app starter kits but if you want a smaller example that will build quicker there’s the webserver project.
You can clone any one of those down and then run:
docker buildx build --platform linux/amd64,linux/arm64 -t testing123 .
That’s going to run through a Docker build sequence that you’ve likely seen plenty of times. Don’t worry about the WARNING at the bottom around not specifying an output.
This won’t be listed under docker image ls like you’ve normally seen. That’s
because we need to --push our image for it be built as a “real” Docker image
and not just exist in Docker’s build cache.
We’ll inspect an already built image from something I’ve pushed to my Docker
Hub account soon but the buildx build step is a really important step to
cover.
It’s this build command where we define the CPU architectures we want to
support through the --platform flag. Right now in the above command we’ve
chosen to support AMD64 and ARM64 for Linux. Even if you have macOS, that’s ok.
It’s still running in Linux within Docker Desktop, assuming you’re building
Linux images (you probably are).
Those 2 platform definitions should support most modern desktop CPUs, newer
Raspberry Pis, AWS’ Graviton (ARM) CPUs and more. Basically linux/arm64 gets
normalized to linux/arm64/v8 which is a widely used ARM version nowadays.
You can choose to add more platforms if you’d like, it accepts a comma separated list. I’d suggest looking at other popular images on the Docker Hub to see what they support because it’s not always easy to track down the exact names to use.
For example the Debian unstable-slim image currently supports these
architectures, you can find them listed on
https://hub.docker.com/_/debian/tags if you filter for unstable-slim:
linux/386
linux/amd64
linux/arm/v5
linux/arm/v7
linux/arm64/v8
linux/mips64le
linux/ppc64le
linux/riscv64
linux/s390x
They’ve explicitly chosen to set linux/arm64/v8 and you can see linux/amd64
in there too.
Basically this will come down to whatever platforms you plan to run or want to
support. Personally I haven’t had any issues using --platform linux/amd64,linux/arm64 on a decently wide range of desktop machines, cloud
servers and CI servers.
By the way, you can gather platform specific support on the command line too:
$ docker buildx imagetools inspect debian:unstable-slim
Name:      docker.io/library/debian:unstable-slim
MediaType: application/vnd.docker.distribution.manifest.list.v2+json
Digest:    sha256:0717daf2e3c953dedd675b28984e251c4f9dbb39df71040e67efb4e1a14b8aa8

Manifests:
  Name:      docker.io/library/debian:unstable-slim@sha256:5ee8267a79bfdbc62c974f26f66432ef86e81821e82b4483115504daa9ffedac
  MediaType: application/vnd.docker.distribution.manifest.v2+json
  Platform:  linux/amd64

  Name:      docker.io/library/debian:unstable-slim@sha256:3c8063bbd029ddb7591b985a1c6410dec1e99fa4da4b7b518474de7fa6728830
  MediaType: application/vnd.docker.distribution.manifest.v2+json
  Platform:  linux/arm/v5

  Name:      docker.io/library/debian:unstable-slim@sha256:a0bf0f3923fbedcb7fabe7484da59f5417e370107bbc8f55222f1310a3726eae
  MediaType: application/vnd.docker.distribution.manifest.v2+json
  Platform:  linux/arm/v7

  Name:      docker.io/library/debian:unstable-slim@sha256:17c0ca8090ce0b53fa545d8ea2cf275211951d303e43a3e3ae91b8dc217992a9
  MediaType: application/vnd.docker.distribution.manifest.v2+json
  Platform:  linux/arm64/v8

  Name:      docker.io/library/debian:unstable-slim@sha256:9ca4d3a39f4b879cab9852e04bb841d3fef1e9e4751916cc790dede3be85e9dd
  MediaType: application/vnd.docker.distribution.manifest.v2+json
  Platform:  linux/386

  Name:      docker.io/library/debian:unstable-slim@sha256:e30973681a7fa80148c92da6121f55eff5f4c92509a79c869f4e8bd91c19fda7
  MediaType: application/vnd.docker.distribution.manifest.v2+json
  Platform:  linux/mips64le

  Name:      docker.io/library/debian:unstable-slim@sha256:0c8af0927d01684204a790aaf423438f60dd9c90d8dbeececb883a35dd9cd315
  MediaType: application/vnd.docker.distribution.manifest.v2+json
  Platform:  linux/ppc64le

  Name:      docker.io/library/debian:unstable-slim@sha256:6e4c03f66c878ad4f282e44f0dd3480d2b3e8a8979cec635c798f4d50b244a57
  MediaType: application/vnd.docker.distribution.manifest.v2+json
  Platform:  linux/riscv64

  Name:      docker.io/library/debian:unstable-slim@sha256:ea553a31be91cc64fea255d407eb70a94a9db1d5a2b7dcbd87661d4ac022ee2e
  MediaType: application/vnd.docker.distribution.manifest.v2+json
  Platform:  linux/s390x
# Inspecting Your Images
On my system which runs a 64-bit Intel CPU, this reports back amd64. If you
were to run that on Apple Silicon you’d get back arm64.
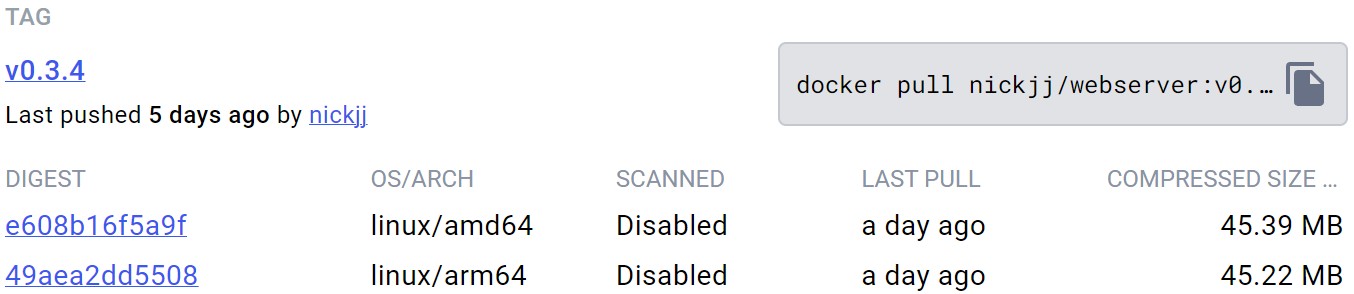
docker image inspect nickjj/webserver:v0.3.4 | grep Architecture
        "Architecture": "amd64",
That’s a quick way to determine if the image sitting on disk on your Docker host has been pulled with a CPU architecture that matches your system.
# Pushing Images to Docker Hub
I’m assuming you already have a Docker Hub account
and you’re logged into it on the command line through docker login. If you’re
not using Docker Hub you can use whatever Docker registry you have.
We can run the buildx build command from before but add --push:
docker buildx build --platform linux/amd64,linux/arm64 --push -t hello/testing123:v1 .
Keep in mind I put hello/testing123 here and it’s expected that you replace
hello with your Docker Hub account, testing123 with your image name and
v1 with your desired tag.
At this point if you went to your image’s tags on the Docker Hub you should see both CPU architectures listed and now folks can pull and run either one. Here’s an example from my webserver project:
# What’s Next? Doing It in CI!
So that’s the TL;DR on using Buildx.
You can run docker buildx rm multi-arch if you want to delete the new builder
we created in this post or you can leave it around for future builds.
It’s really handy to build images that support different platforms but chances are you don’t want to build these images on your local machine.
A common workflow is pushing code to GitHub or another git provider, having a CI pipeline build your image, run your tests and if those tests pass then push your image to a Docker registry such as the Docker Hub. Then your server(s) can pull those images down and run them.
Wouldn’t it be nice if we could build and push multi-CPU architecture Docker images to our Docker Hub account every time we pushed a new git tag to a repo on GitHub? This could constitute as a new release.
Yep, that would be nice! That’s covered in this post and video.
# Demo Video
Timestamps
- 1:03 – Buildx use case
- 2:38 – What is Buildx?
- 6:06 – Creating a new builder
- 9:00 – Inspecting the default and new builder
- 12:06 – Building images with Buildx
- 17:00 – Figuring out which platform types are supported
- 20:29 – Inspecting your images
- 22:03 – Pushing multi-arch images to the Docker Hub
- 24:00 – What’s next? Doing this in a CI pipeline
Are you creating multi-arch Docker images? Let us know below.