Create Bootable Arch USB on Linux / macOS with cat (Rufus on Windows)
You can use this to install Arch Linux or act as a recovery disk. Technically this method works for most Linux installers.
Prefer video? Here it is on YouTube.
The Arch Wiki is a treasure trove of information. It has a whole
page related
to creating bootable drives. This is where I learned you can use cat instead
of dd.
You can use this method to set up a USB stick to install Arch Linux or any ISO that supports hybrid images which includes most Linux distros.
The installer also acts as a recovery drive in case you can’t boot your system.
You can boot off the USB drive and chroot into your system to fix whatever
went wrong.
Once the USB stick is set up, we’ll also go over how to configure your BIOS to boot from it no matter which OS you’re using (Windows, macOS or Linux).
Before continuing you’ll want to:
- Get a USB flash drive that has at least 4 GB of space
- Download the official Arch ISO (or whatever distro you’re using)
- You’ll likely get the
archlinux-YYYY-MM-DD-x86_64.isofile, it’s about ~1.5 GB
- You’ll likely get the
# Linux
First things first, you’ll want to find your flash drive’s disk. You can run
lsblk for this. I like to include the model too, here’s the output of my
machine:
$ lsblk -o +model
NAME   MAJ:MIN RM   SIZE RO TYPE MOUNTPOINTS                 MODEL
sda      8:0    0 238.5G  0 disk                             Crucial_CT256MX100SSD1
├─sda1   8:1    0     1G  0 part /boot
└─sda2   8:2    0 237.5G  0 part /
sdb      8:16   0 931.5G  0 disk                             WDC WD10EZEX-22BN5A0
└─sdb1   8:17   0 931.5G  0 part /data/storage
sdc      8:32   0 931.5G  0 disk                             WDC WD10JMVW-11AJGS4
└─sdc1   8:33   0 931.5G  0 part /data/backup
sdd      8:48   1  29.9G  0 disk                             Flash Drive
└─sdd1   8:49   1  29.9G  0 part /run/media/nick/TEMPFILES
zram0  253:0    0     4G  0 disk [SWAP]
My USB drive is mounted, if yours is not you won’t see a mount point. That’s normal. We actually don’t want it mounted in the end, I mounted mine to show how to unmount it later. Also, your USB drive’s details might look different depending on what’s on it, that’s normal!
It’s really important to know how to read this output since we’ll be wiping the flash drive. You wouldn’t want to do this on the wrong disk, or you’ll wipe that disk instead!
This is why I like to include the model column. It provides more information. Sure in the above output I have a 32 GB USB drive so it’s easy to see with the size alone, but look at the (2) 1 TB disks in the middle. I do have them mounted to different paths with descriptive names but it’s also nice to see the model numbers too.
For context, on my machine:
sda: 256 GB SSD (Crucial) is my main drive and has the boot and root partitionssdb: 1 TB HHD (internal Western Digital) is for storage at/data/storagesdc: 1 TB HHD (external Western Digital) is for backups at/data/backupsdd: 32 GB (Flash Drive) is you guessed it, the flash drive
If you want to get further confidence you can run:
$ ls -la /dev/disk/by-id/usb-*
... /dev/disk/by-id/usb-Samsung_Flash_Drive_0363321070004825-0:0 -> ../../sdd
... /dev/disk/by-id/usb-Samsung_Flash_Drive_0363321070004825-0:0-part1 -> ../../sdd1
... /dev/disk/by-id/usb-WD_My_Passport_259F_57584D3141433530375A4E54-0:0 -> ../../sdc
... /dev/disk/by-id/usb-WD_My_Passport_259F_57584D3141433530375A4E54-0:0-part1 -> ../../sdc1
In the above output on the right you can see sdd which matches up to the
lsblk output. It is a Samsung 32 GB flash drive. The other sdc one you see
is the 1 TB external USB Western Digital “My Passport” drive. I definitely
don’t want to wipe that!
Name vs ID
Technically we can use either one when we eventually run our cat command.
In my case, that would be either one of these:
/dev/sdd/dev/disk/by-id/usb-Samsung_Flash_Drive_0363321070004825-0:0- Use the one that doesn’t have
-part1, we want the device name itself
- Use the one that doesn’t have
The name (sdd) may change over time based on driver load order,and other
criteria so you can’t always guarantee it will be the same across reboots.
Before you do anything destructive always confirm it’s the correct name.
I think this is why the Arch Wiki suggests using the descriptive long ID. That will never change depending on load order so it’s more dependable and explicit.
Even though it’s more typing, we’re going to roll with the Arch Wiki’s approach to reduce the chances of operating on the wrong disk. If you really want to use the name, you can.
Steps
I’ve gone ahead and lined up a couple of commands for you. All you have to do
is modify the TODO values to use your disk ID and ISO download path before
copy / pasting them.
# TODO: Modify this to be your disk ID.
export DISK_ID="/dev/disk/by-id/usb-Samsung_Flash_Drive_0363321070004825-0:0"

# TODO: Modify this to where you downloaded your ISO.
export ISO_PATH="~/Downloads/archlinux-2026.04.01-x86_64.iso"

# Unmount the file system if it's not already unmounted. Replace "part1" if yours
# is different. Unmount all file systems if there's more than 1.
umount "${DISK_ID}-part1"

# We need to do this as root, you can't redirect to a file with sudo cat so
# we use tee instead. We also sync so all buffers are written before ejecting.
time cat "${ISO_PATH}" | sudo tee "${DISK_ID}" >/dev/null && sudo sync
On my machine from 2014, the entire process took 1 minute and ~49 seconds:
cat "${ISO_PATH}"                  0.10s user 0.88s system 6% cpu 15.657 total
sudo tee "${DISK_ID}" > /dev/null  0.05s user 0.02s system 0% cpu 1:48.82 total
You won’t get any output until it finishes, so hang tight.
Confirm
Now we can run lsblk again:
$ lsblk -o +model
NAME   MAJ:MIN RM   SIZE RO TYPE MOUNTPOINTS   MODEL
sda      8:0    0 238.5G  0 disk               Crucial_CT256MX100SSD1
├─sda1   8:1    0     1G  0 part /boot
└─sda2   8:2    0 237.5G  0 part /
sdb      8:16   0 931.5G  0 disk               WDC WD10EZEX-22BN5A0
└─sdb1   8:17   0 931.5G  0 part /data/storage
sdc      8:32   0 931.5G  0 disk               WDC WD10JMVW-11AJGS4
└─sdc1   8:33   0 931.5G  0 part /data/backup
sdd      8:48   1  29.9G  0 disk               Flash Drive
├─sdd1   8:49   1   1.2G  0 part
└─sdd2   8:50   1   252M  0 part
zram0  253:0    0     4G  0 disk [SWAP]
We see (2) partitions this time around. One of them is the boot partition (252MB) and the other is the installation files (1.2 GB).
We can mount and investigate the installation files with the commands below.
We’ll be using udisksctl which is part of the udisks2 package. Chances are
you have this installed on most Linux distros running any type of desktop
environment. If you’re a hardcore minimalist you can replace the commands below
with mount, umount and eject along with creating and removing the mount
paths manually.
Replace the disk name and mount path based on your outputs:
$ udisksctl mount --block-device /dev/sdd1
Mounted /dev/sdd1 at /run/media/nick/ARCH_202604

$ ls -la /run/media/nick/ARCH_202604
total 2207
drwxr-xr-x  6 nick nick     512 Dec 31  1969 .
drwxr-x---+ 3 root root      60 Apr 25 09:40 ..
drwxr-xr-x  3 nick nick     512 Apr  1 13:12 arch
drwxr-xr-x  3 nick nick     512 Apr  1 13:12 boot
drwxr-xr-x  3 nick nick     512 Apr  1 13:12 EFI
drwxr-xr-x  3 nick nick     512 Apr  1 13:12 loader
-rw-r--r--  1 nick nick 1128000 Apr  1 13:12 shellia32.efi
-rw-r--r--  1 nick nick 1128000 Apr  1 13:12 shellx64.efi
If you’re using a file manager like Thunar, it typically auto-mounts USB drives for you but if you open it, you’ll see it there too.
When you’re happy, you can unmount and safely eject the USB after running:
# Don't forget to modify the disk name to be yours.
udisksctl unmount --block-device /dev/sdd1
udisksctl power-off --block-device /dev/sdd
That’s pretty much exactly what Thunar and other file managers do for you if you use their menus to eject a USB drive. Now it’s safe to physically disconnect.
You can skip to the BIOS section now to configure it to boot from this USB drive.
# macOS
This is similar to the Linux section, except there’s different commands.
Find your USB drive’s disk, your output is going to look different than mine:
$ diskutil list
/dev/disk0 (internal, physical):
   #:                       TYPE NAME                    SIZE       IDENTIFIER
   0:      GUID_partition_scheme                        *500.3 GB   disk0
   [ ...omitting for brevity... ]

/dev/disk4 (external, physical):
   #:                       TYPE NAME                    SIZE       IDENTIFIER
   0:     FDisk_partition_scheme                        *32.1 GB    disk4
   1:                       0xEF                        264.2 MB    disk4s2
                    (free space)                        30.5 GB
You can find it based on size, in my case I had a 32 GB USB drive. You can also
run diskutil info disk4 (replace the number with yours) to obtain more
information. That will at least show the device / media name near the top, it
might say “Flash Drive” or something else.
Before continuing, you’ll want to make sure you know the disk you want to
operate on since it will be wiped. In my case, it’s disk4.
Steps
These commands are based off disk4 as being the identifier. You’ll want to
adjust them and the download path accordingly. With the tee command, the r
before the disk name is not a typo. It’s for “raw mode” which will be much
faster.
# Unmount the file system if it's not already unmounted. Replace "s2" if yours
# is different. Unmount all file systems if there's more than 1.
diskutil unmountDisk "/dev/disk4s2"

# We need to do this as root, you can't redirect to a file with sudo cat so
# we use tee instead. We also sync so all buffers are written before ejecting.
cat "~/Downloads/archlinux-2026.04.01-x86_64.iso" | sudo tee "/dev/rdisk4" >/dev/null && sudo sync
Depending on your USB drive, that should finish anywhere from a few seconds to a few minutes. You won’t get any output until it finishes, so hang tight.
Confirm
The file system won’t be readable on your Mac to confirm the contents but as long as it didn’t error out you should be good to go.
You can run diskutil eject disk4 (replace the number with yours) to safely
eject and power off the USB device if you want to physically disconnect it.
You can skip to the BIOS section now to configure it to boot from this USB drive.
# Windows
Technically if you have WSL 2, there are ways to get WSL 2 to see your USB drive which would let you follow the Linux section but it’s likely not worth setting that up if your goal is to format and install Linux anyways.
There are many tools to do this and Rufus is a solid choice. It’s open source and has a decade+ long track record. I’ve used it for longer than I can remember to make bootable USB sticks for both Windows and Linux.
I used it to make my first Arch Linux bootable USB drive when I switched to native Linux.
Unfortunately I didn’t record any videos or take screenshots of the process but it’s a GUI tool and I’m sure you can figure it out without a visual aid using the steps below:
Steps
Open Rufus and then follow this:
- Device:
- Pick your USB drive
- Boot selection:
- Pick the Linux ISO you downloaded earlier
- Partition scheme / target system:
- Choose GPT and UEFI
- Format options:
- You can leave the defaults (FAT32 for the file system)
- Press “START”
- It will prompt you about “ISOHybrid image detected”:
- Use the recommended “Write in ISO Image mode” option and press “OK”
- It may prompt you about downloading the newest version of Syslinux:
- Press “Yes”
- It will prompt you with a warning about deleting the data:
- Press “OK” if everything looks good
- After it finishes, you can close Rufus and safely eject the USB drive if you want
That’s it, you’re all set to jump into your BIOS to start using it.
# BIOS / UEFI
Most machines use UEFI (Unified Extensible Firmware Interface) instead of the legacy BIOS. Even my machine from 2014 has UEFI, it’s what allows editing your BIOS in a GUI with mouse support and also provides features like secure boot and more.
When I say “BIOS”, I really mean UEFI or legacy BIOS because when casually speaking about this concept it’s common to refer to both of them as “your BIOS”.
Here’s the game plan:
- Disable secure boot
- The arch bootable disk requires this and the official wiki mentions it
- Change the boot order so the USB drive is first in the list
- Remember where it is, you’ll change it to your main drive after you install your OS
Each BIOS has different looking menus, and even entering your BIOS will be different depending on your motherboard or computer’s model.
As soon as you turn on or reboot your computer, hit delete, F2 or whatever your machine’s BIOS activation key is. Sometimes it shows you early on while your machine does its POST (power on self test).
On laptops it’s often F1, F2, or F10. If your laptop has no F keys, you usually have to hold the Fn key and a number key. When it doubt, check your machine’s manufacturer and model number and Google around for the key you need to hit.
I can’t include screenshots for each BIOS but here’s screenshots on my machine:
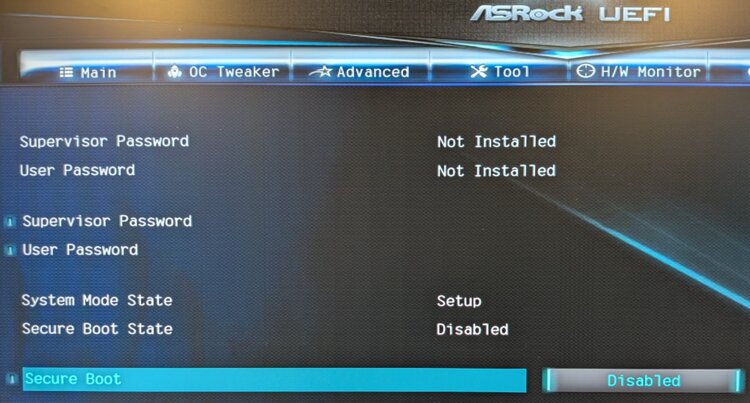
Disable secure boot (it was under “Security”):
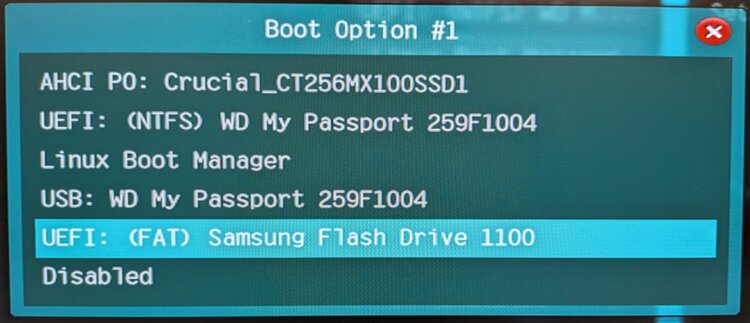
Boot order (it was under “Boot”, I moved it to the top):
Save and exit
When exiting your BIOS you’ll usually have the option to save and exit or discard and exit. You’ll want to save and exit.
Your machine should now boot up from the USB drive and you’ll be greeted with a boot loader where you can pick to install Arch Linux or whatever distro you’re installing.
Have fun with your new install! If you’re looking for an Arch based environment geared towards developers or power users, DotFriedRice sets up a fully configured niri based system and supports customizing it in many different ways.
The video below goes over creating the USB drive on Linux.
If you’re ready to install Arch Linux, I have a complete walkthrough for it.
# Demo Video
Timestamps
- 1:34 – Live demo on Linux and finding your flash drive
- 4:43 – Getting ready to write to the USB drive
- 7:48 – Using cat to create the bootable USB drive
- 9:57 – Confirming it works
- 12:39 – macOS steps
- 15:54 – Windows steps
- 18:20 – Configuring your BIOS on any OS
How do you create bootable USB sticks? Let me know below.