How to Start and Finish Any Web App Project

Learn how to transform a project idea into a finished application by following these actionable and repeatable steps.
# Building Bridges
Did you know it took about 65 years for the Golden Gate Bridge to go from conception to being built?
In 1872 a dude by the name of Charles Crocker proposed building a bridge between San Francisco and Marin County (the towns connected by the Golden Gate Bridge).
It wasn’t until 1917 that another fellow by the name of Joseph Strauss who went on to be the chief engineer of the bridge sent in an informal proposal to build it. Then a few years later in 1921 he submit a proposal to build it for an estimated $17 million dollars.
In 1933 construction began on the bridge and things were complete a remarkably 4 years later in 1937 (I know, it surprised me too at how fast it was built).
It ended up costing $27 million dollars, which was 60% over the estimate and in today’s dollars that equates to $1.5 billion dollars.
I’m not a bridge historian but building bridges and building web applications or any software project have a lot in common.
What if Joseph Winged It?
What if chief engineer Joseph Strauss decided to:
- Buy $8 million dollars worth of materials on estimates
- Went to the 1920s version of Craigslist and hired 100 contractors
- Verbally explained what the bridge should look like to everyone
- ???
- Profit!
I would be confident in saying that he would have been way off on everything and the bridge would have likely crumbled if a flock of geese landed on it.
Why Do We Wing It With Software?
A lot of people and even myself included tend to rush into software related projects as if writing the code is the most important thing to do first.
I’ve been writing and shipping code for about 20 years and I’ve looked at dozens of projects by dozens of teams. I can say for damn sure that you’ll be in better off shape if you spend some time up front planning things out.
Over the last few years you may have heard of terms such as “agile” or “shipping fast”, and those things are great in the correct context but that doesn’t mean you should try and develop a complicated web application without spending some time up front planning things out.
What’s on the Agenda for This Guide?
This guide is going to show you how to take a real web app idea and transform it into an actionable plan. You’ll be able to apply these same steps to your own projects and it won’t matter what web framework you use because we won’t be writing a single line of code.
It also doesn’t matter if this idea came from your head, or from a potential client during a consultation that you just had.
When I do consultations with clients, I often record the conversation and from there I’ll break everything down. In fact, you could offer this break down as a “project discovery” document or presentation (and even charge money for it).
It certainly has a lot of value because quite a bit of tricky planning work gets done, and it can even be passed onto someone else to do the actual programming work if you’re unable or unwilling to do it yourself.
This plan is a great way to spend your time because if it needs to be refined you can do it without having to change any code because you haven’t coded anything yet.
Also don’t be alarmed by the name “plan”. We’re not going to sit down for a year and write out a 500 page business plan and hire a committee. Once you get the hang of things you’ll be able to plan most projects out in a few hours or less.
Recap
To recap, you’ve learned that:
- Building bridges and building software is somewhat comparable
- Plans will save you time in the long run
- We’re going to transform a real web app into an actionable plan
# Let’s Make a Plan
Before we can jump into creating a kick-ass plan, we need to first define what type of web application we’re building.
For my own ideas I tend to naturally speak into a microphone and explain what I want the site to do. I feel like this is good practice because it emulates what clients will do to you during a consultation.
Being able to distill a long winded description of an idea into 1 primary goal is an important skill to have.
Below is a transcript of what I recorded when I began rambling about what the Build a SAAS App with Flask course’s example application will do.
This guide is an inside look at how I started a 4,000+ line Flask application:
I want to create a video based training course that teaches developers about Flask. Most tutorials I’ve read are scattered and don’t deal with creating production ready applications.
I feel like this is a shame because typically when you create your own projects you want them to be well designed and maintainable, in other words production ready.
The last thing I want to do is create something like a TODO list app and I’m not sold on the idea of creating 10 different apps in the course because because it would end up being 30 hours of video that doesn’t really teach you anything for “real”.
My gut tells me a larger single application that connects at various points might be more valuable to people because it could show how different parts of the system connect.
Something I rarely see in tutorials is dealing with payments so it would be cool if I include a way to integrate with a popular payment gateway like Stripe.
Then users of the system could sign up for a specific monthly plan and they would be billed every month automatically. It would also be nice if I showed how to do 1 off payments.
Definitely need to think of something fun to build that’s protected by the pay wall so that people don’t get too bored because this project is going to be pretty damn big.
Maybe I can create a game. I don’t want the focus of the course to be on the game so it can’t be something super complicated or involve large third party libraries.
The game also needs to be common enough that people will be able to understand it without too much thinking. It should also have some type of soft real time aspects, so I can deal with ajax requests and JSON responses, that is something people have asked me to demonstrate in other learning material.
I can still work on the app without knowing about the exact game. It will need user registrations for sure as well as a contact form just to demonstrate e-mail.
There should be a couple of static pages too like a home page, terms of service and privacy policy. Don’t need to go into great detail about the legal pages but it would be a nice touch to include a template for them because it’s always a pain to track these down on your own.
Hmm, what else. Need to make sure to include a CLI component to help manage the project, like setting up seed data and database migrations.
Internationalization is also important because a lot of people produce content in multiple languages nowadays.
Let’s wrap it all up with a custom admin dashboard too.
I removed a lot of “umms” and awkwardly worded sentences just to make it more readable but that’s about 95% of what I spoke into a microphone when thinking about what to make for the course.
How to Turn the Above Into a Plan
Now for the fun stuff, how would you condense the above spew of words into 1 main goal? This goal is very important because it’s going to be the basis of your application. Every other feature will derive from this goal.
On a related note, a common term you might hear out in the wild is “MVP”, which stands for Minimal Viable Product. That’s the absolute minimum your product needs to do before it’s ready to be shown to the world.
In the BSAWF (Build a SAAS App with Flask) case that’s accepting recurring payments from a customer.
I came to that conclusion because technically if all I did was set up everything to support that and put in a dummy “put protected data here” page behind the pay wall then everything still makes sense.
It’s important to stick to your guns once you define this goal because if you get into the habit of adding a million “side” features then your application is going to lose focus and will be delayed.
Those side features might not even be what your customers want.
Realistically when you ship your MVP you’ll want to start getting feedback from customers. Now you can start molding your application based on that feedback instead of guessing.
That’s actually what I did in the BSAWF course because I released a first version of that course and while it was successful, I did introduce a few things into the application that a number of people didn’t really care about.
So for version 2 (which is what this guide is based on and the video course), I listened to customer feedback from previous students and blog post comments.
Practice Makes Perfect
To practice extracting main goals, let’s look at a site such as GitHub. To me GitHub is a platform that lets me publish and share code with other developers.
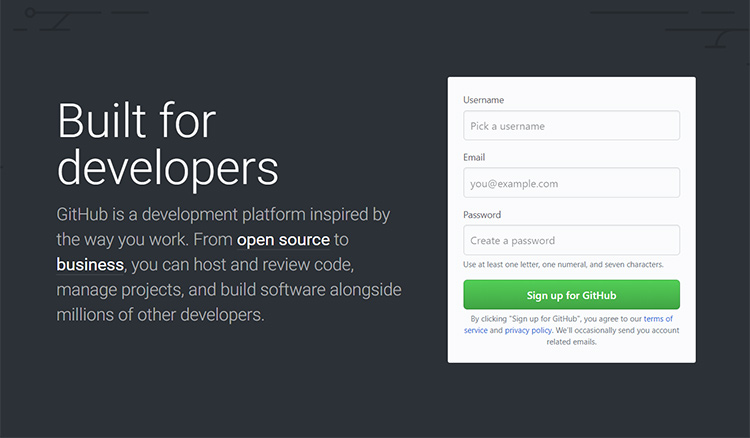
“Built for developers” is what GitHub is trying to say to people when they first see their site. Their main goal is that sentence beneath it which sums things up nicely.
Recap
To recap, you’ve learned that:
- Rambling into a microphone is a great way to talk about your project
- Distilling minutes of unplanned words into 1 goal takes practice
- An MVP’s main goal should be the core of your project
- Leverage your customers for additional features instead of guessing
# From Goals to Steps
Having a main goal is a tremendous help to figure out what needs to be done.
From here, we’ll slowly but surely break that goal down into features and actionable steps. The steps are going to be focused ideas that you can start coding.
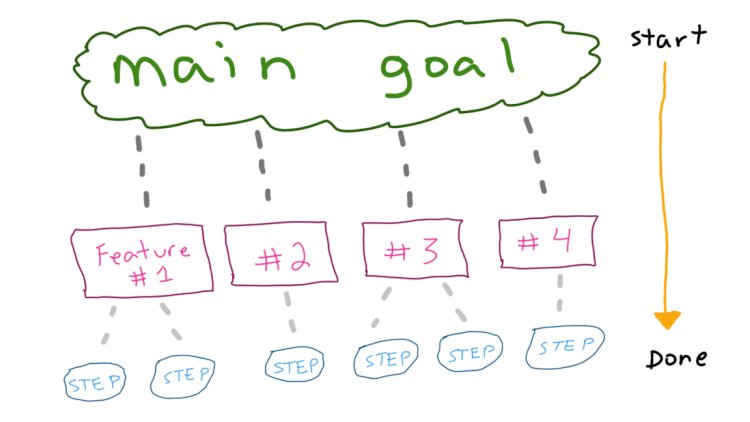
When we work top to bottom, the broadest goal and features eventually turn into small steps that are well defined and easy to reason about.
Exploring the App’s Features
The main goal is to accept recurring payments from customers. Just using natural language we’ve managed to define 2 broad features.
We’re going to need a way to handle:
- Payments
- Users
Both of these things are pretty big and if you told me “Hey Nick, build me a payment system” I would be stumbling around in my code editor for quite some time if I tried to attack that problem without breaking it down.
Not only that but I’d definitely design things poorly and end up re-writing it multiple times once I saw how all of the pieces fit together in the end.
Let’s talk about payments in more detail then shall we?
Payment Features
When breaking down features into either steps or smaller features, there’s no real magic formula or convention to determine if it’s a step or a sub-feature.
Just use your best judgment and don’t get hung up on things like this. Whenever possible go into as much detail as you can. The deeper you drill down, the smaller the problem will be and it will be easier to reason about.
I also like to nest things out in a list, such as:
- View multiple subscription plans through a pricing table
- Pick and subscribe to a specific plan
- Enter in credit card details to subscribe to a plan
- Process credit card with Stripe
- Enter in credit card details to subscribe to a plan
- Pick and subscribe to a specific plan
- Upgrade or downgrade subscriptions
- Cancel a subscription
- Create 1 off purchases (micro-transactions)
- Apply coupons to subscriptions and 1 off purchases
- Save invoices for all transactions
- View a billing history for all transactions
- Ensure local invoices are synced with Stripe
- Detect and track soon to be expiring credit cards
- Warn a user when their card is going to expire soon
- Update credit card information
Suddenly our payment system isn’t looking that crazy anymore. It’s becoming well defined and I’m sure your brain is cooking up how you could implement some of these things in your favorite web framework.
Even if you didn’t know exactly what to do, you would be in good shape to Google for a solution. You could literally type “how do I cancel a subscription with Stripe” and find some type of answer.
User Features
Let’s talk about the user features now. We’ll tackle the breakdown in the same way that we did for payments:
- Create an account by providing an e-mail address and password
- Login and logout
- Track all sign in activity (IP address, timestamp, etc.)
- Ability to collect additional information when it is required
- Username (public identity for the website)
- Reset password
- Provide identity to initiate a password reset request
- Submit a new password after clicking the link in their e-mail
- Account management
- Edit login credentials
- Edit profile information (username, etc.)
- Alter subscription status
- View billing history
Once we start talking about each step it’s no longer that scary. We can also see that under account management, this is where payment settings can be adjusted.
By just planning things out this way we can begin to think about “screens”, which could be actual pages on the website, but we’ll get into that later.
For now, let’s continue onwards and plan out the game.
Game Features
At this point you’re probably starting to get the idea. In my earlier transcript of this project I put off defining what type of game we’re going to play because it wasn’t that important in the grand scheme of things.
Eventually I decided I wanted to create a dice game called Snake Eyes. It was simple, each user account would get a set number of coins for free and then users could purchase additional coins as micro-transactions and / or receive additional coins by becoming a monthly subscriber.
Users could then wager these coins while trying to guess the outcome of a dice roll and if they won they would receive more coins back depending on the odds.
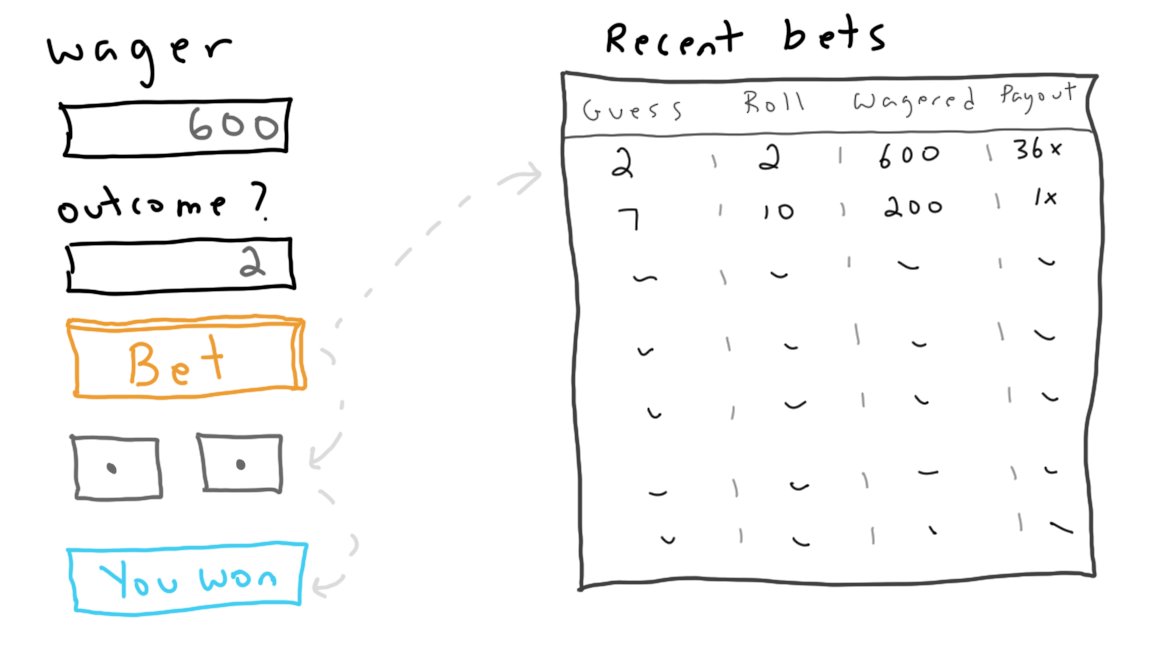
I envisioned that the dice roll would happen on the server side after pressing the bet button and then the client would partially update the page with an ajax request. This works out nicely to demonstrate partial page reloads.
Here’s the breakdown of the game:
- User can place bets by wagering coins
- Only if they have coins to wager
- Only if they haven’t spam bet beforehand (rate limiting)
- Create bet history to show life time bet history
There’s really not too much here, but it’s worth mentioning that our user features will end up changing because the account management feature needs a way for users to view their betting history and buy more coins.
Since we haven’t written any code yet, it’s very easy to change the plan. I won’t do it here, but you would be just adding more steps to the list.
Admin Features
I’m not going to plan out the admin features here because I would like you to try doing it based on the other features we set up.
It’s not important if your feature and steps list matches what’s really in the project, but the goal here is to get you to think about how you would personally administrate this web application.
More importantly, this exercise is about taking action and doing something. Planning is a skill like anything else, you need to practice doing it, not just sit here passively reading.
Here’s a few interesting questions to get the ball rolling:
- Do you want to be able to create subscription plans through an admin dashboard or command line?
- How will you handle coupon creation? What type of features should it support?
- Should admins be able to cancel user subscriptions?
- If a customer calls you, how fast can you find all details about that user in your system?
Feel free to open up a text document or jot things down on paper. I’d love to hear what you came up with, please e-mail me at nick.janetakis@gmail.com.
CLI Features
In a similar fashion to the admin features I’m not going to plan things out for you, but this time it’s for a different reason.
I never bothered to plan these out and for certain things I think that’s ok.
First let me explain what a CLI (command line interface) feature even means.
During the development of a web application you tend to perform a few tasks such as seeding your database, database migrations, running tests and more.
Some of these commands can be tedious to run, especially with Flask. In the BSAWF case I created 10 CLI commands to improve your quality of life.
They are:
addwhich allows you to seed the database with fake data per modelbabelfor dealing with internationalization (i18n) managementcovfor running a test coverage tool against the code basedbfor database migrations which wraps Alembicflake8for doing static analysis on the code baselocfor counting the lines of code (Python, HTML, CSS and JS)routesto get an ASCII list of all of your routes, endpoints and methodssecretfor generating unique secret tokensstripefor managing subscription planstestto run the py.test driven test suite
Being able to run snakeeyes add all and having the database get reset and
populated with thousands of fake but relevant users, invoices and bets is
unbelievably useful for development.
The reason I didn’t plan these out is because half of them didn’t even come into existence until I was personally annoyed by having to type certain things out all the time.
In this case, you could say the CLI features were based on user feedback instead of guess work and that’s the way to do it for a lot of things. Especially when it’s for “side” features that aren’t necessarily the core of your project.
Recap
To recap, you’ve learned that:
- A main goal is important and it helps guide features and actionable steps
- You’ll likely end up writing and re-writing a lot of code without a plan
- Your plan could be a simple bullet list of features
- Planning is a skill and you should practice it as much as possible
- Sometimes it’s ok to proceed without a plan such as CLI features
# Beyond the Plan
The plan is meant to take a vague idea like “accept payments” or “publish and share code with other developers” and break it into manageable, well defined steps that you can start coding.
Down the line after your project ships, you will end up adding or removing features based on real feedback but I personally don’t feel like it’s worth keeping your plan in sync.
If you’re still in the planning phase and you’ve added new things before writing code then sure go back and edit other components of your plan.
But I see the initial plan as a means to an end. You write it to serve an initial purpose, then you take action on it and move on with life.
It’s also fun to look back on old plans and see how much your product changed.
But Wait, There’s More
I also find these plans to be useful for pesky consulting clients who don’t understand why you’re charging what you’re charging. They come to you with this idea and then are perplexed that you quote them for 300 hours of work and it’s futile to explain why in a few words.
This is where you go over the plan / project discovery document with them.
Most of the time their eyes will glaze over and give you the old “ok ok, now I see why. Keep up the great work, I’m happy I hired you!” line.
If you have a few minutes I highly recommend you read The Door Problem.
It’s one of the best articles I’ve ever read that breaks down something as seemingly simple as “let’s add a door to our video game” into an epic list.
From Steps to Screens
This is starting to go beyond just planning a project but once you have your completed plan I like to go through all of the features and steps and start mapping them to website screens.
These will be real pages on your website, such as the forgotten password screen or entering in your credit card details to make a payment.
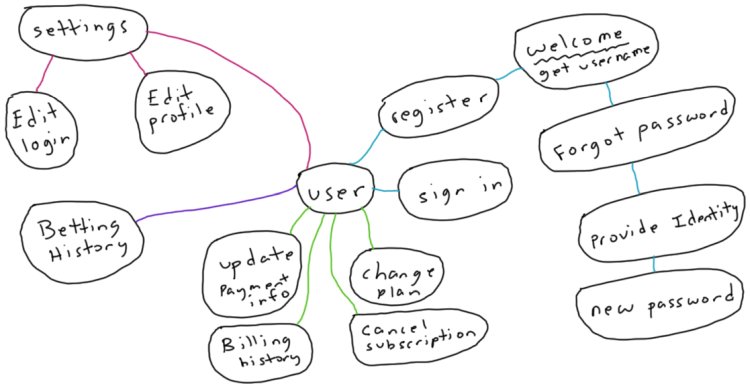
I don’t spend a lot of time on this step and do not use any fancy wire framing apps. I don’t even sketch out these screens, I just list them out in a mind map.
A mind map is just a fancy word to describe a strategy for listing out “things”.
A picture best describes that, take a look:
Modeling Your Data
At this point I’ll start thinking about the data models in the project.
I don’t crack open any software for this either. Just a piece of paper and a pen. The goal here is to start questioning how you’ll use the data in written form.
For example:
- Users should be able to see a list of their betting history
Right away we know that betting history will need to be stored in the database,
perhaps as a bets table but the exact name isn’t important now.
We also know that users will need to be stored as well.
If users should be able to see their own betting history, then we immediately begin to realize that we have a 1 to many relationship happening.
We could take this 1 step further and say a user has many bets and
a bet belongs to a user. If you’re a Rails developer has_many and
belongs_to should ring a few bells.
It’s a very natural way to describe that type of relationship.
Is It Time to Write Code Yet?
Well, not really. Now you should take all of what you’ve planned and start looking at various technology stacks to see which framework and data stores are best suited for the problem at hand.
You have all of the information necessary to make an informed decision rather than just taking a guess and figuring out 6 months from now that things would have been 100x easier if you used xyz web framework even if you had to learn the language and web framework from scratch.
But picking technology stacks is a tale for another day…
Practice Practice Practice
If you don’t have a project idea yet, don’t worry you can still practice. Just head over to your favorite websites and start thinking about what their main goal is, and start designing features and actionable steps from that.
If you’re feeling adventurous you could record your friends and family members explaining to you what type of application they would want to build if they knew how to program.
Then take that recording (which will probably be hilarious and likely be a top 10 worst idea ever) and convert it into a plan. You know the drill!
Where to Go Next?
So that sums up how I start and finish any web application project.
You’ve learned how to plan out a project, tease out features, create specific website screens, model data and using all of this, you can pick the right tools for the job. You have everything you need to put a real application together.
I hope this guide has given you at least 1 nugget of information that you can start applying to your own projects immediately.
P.S.,
If you want a screencast guided tour on how BSAWF was built along with all of the battle hardened source code then check out the Build a SAAS App with Flask course.