ngrok, lvh.me and nip.io: A Trilogy for Local Development and Testing

Learn how to accept webhooks on your local web server, work with subdomains on localhost and test Let's Encrypt without a domain name.
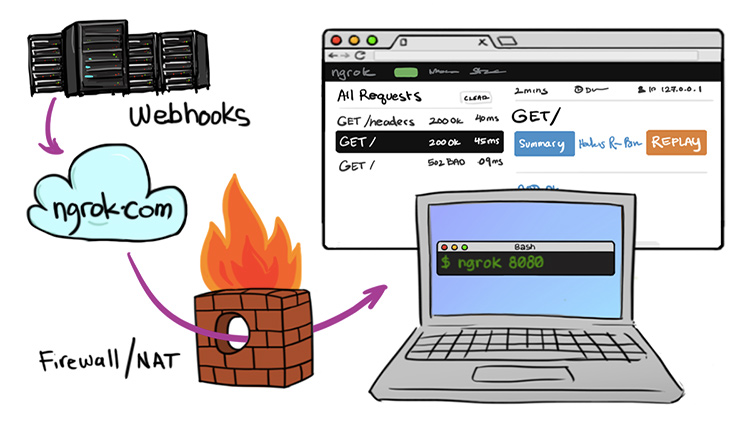
The above image is taken from ngrok’s website.
When developing real world applications you tend to run into certain road blocks such as:
- How do I test webhooks locally?
- How can I show a demo of my site to a client?
- How can I develop a web app that uses subdomains on localhost?
- How can I test Let’s Encrypt without a domain name?
In this article, we’re going to cover all 4 use cases using 3 free tools and services.
# ngrok
Webhooks are a really powerful concept. They let you integrate with third party services in a very easy way and you can do it without having to constantly pull information from a service.
For example, let’s say you wanted to perform an action after an invoice was
created with Stripe. You could just listen for Stripe’s invoice.created event,
and when this happens on Stripe’s end, they will send the details of that invoice
to a web address of your choosing.
That’s fine and dandy if you’re running in production and have a publicly accessible address such as your domain name but what about during development?
You can’t just tell Stripe to access http://localhost because that address
isn’t publicly accessible to the internet.
You can get around this by forwarding your web server’s port on your router and then use your public IP address as the webhook URL but that’s super annoying, exposes your public IP address and it will very likely change because most home grade cable / DSL connections have dynamic IP addresses.
Not only that, but some services require that you respond to webhooks over HTTPS, so now you would be responsible for setting up HTTPS too, when really all you want to do is test a webhook in development.
This is where ngrok comes into play.
It’s a free tool that you can download and run on your dev box. They describe
themselves as a secure tunnel to localhost, and it’s just that. It’s as simple
as running ngrok http 3000 to forward port 3000 (or any port) to a public
ngrok address.
After running ngrok http 3000, you would see something similar to:
Tunnel Status                 online
Version                       2.0.25/2.1.18
Region                        United States (us)
Web Interface                 http://127.0.0.1:4040
Forwarding                    http://19b31736.ngrok.io -> localhost:3000
Forwarding                    https://19b31736.ngrok.io -> localhost:3000
And now you could access https://19b31736.ngrok.io which is a public secure
version of your local web service running on port 3000. No port forwarding required.
This is not only useful for webhooks but it’s also great to showcase a demo site to a client. I do it all the time. You just spin up the ngrok tunnel and do a live call with a client and walk them through your application without needing to set up a real host.
# lvh.me
When it comes to developing sites that use subdomains, this can be a nightmare
to set up in development because localhost isn’t a fully qualified domain name.
You can’t just goto example.localhost.
Lucky for us, it’s super easy to use subdomains in development nowadays.
http://lvh.me is a free service that resolves
itself along with all subdomains to localhost.
There’s nothing to install or run. In fact, if you tried to visit that site it would fail unless you happened to have a local web app running on port 80.
If you run host lvh.me you can see that it maps back to 127.0.0.1 which is
localhost. Easy peasy. I talked about this host command once when
debugging DNS errors with Let’s Encrypt.
So how do you use it?
If you are building a multi-tenant web application and wanted to test the example
tenant all you have to do is goto http://example.lvh.me and it would work. Done!
It even works without subdomains too. For example, if you had an app running
at localhost:8000 on your dev box, you could goto lvh.me:8000 to load it.
Now you can test your app with a fully qualified domain name.
# nip.io
Lastly, setting up Let’s Encrypt for the first time can be pretty difficult. That’s why I put together an end to end video course that takes you through every step of the way.
Anyways, the last thing you want to do is start testing Let’s Encrypt against your real domain name because you could easily blow up your main site if you’re not careful.
Also, you can’t register SSL certificates directly to an IP address so you can’t register a different certificate against your server’s IP address.
Now… you could use a dummy subdomain on your real domain name and this would work (it’s what I would recommend too), but sometimes you’re not at the point yet where you have a domain name hooked up yet.
However, you can get around that by using http://nip.io/ (and similar services).
For example, let’s say you had a real web server running on 42.42.42.42. You could visit http://42.42.42.42.nip.io and that would work right off the bat without having to install or run anything. You could also test your Let’s Encrypt set up against that domain.
Note: I would only use the Let’s Encrypt staging server to test this because all nip.io addresses will share the same live rate limits for certificate creation, but that’s all you need to test your set up.
Technically nip.io Works for Local Subdomain Development Too
You could completely replace lvh.me with nip.io, but I find lvh.me a bit nicer to type. If you wanted to stick with nip.io for subdomains you would visit http://example.127.0.0.1.nip.io. Compare that to http://example.lvh.me and now you know why I prefer lvh.me.
So that’s the trilogy. I hope you enjoyed it. I know I enjoy using these tools almost daily!