Setting Up Docker for Windows and WSL to Work Flawlessly
With a couple of tweaks the WSL (Windows Subsystem for Linux, also known as Bash for Windows) can be used with Docker for Windows.
This post only applies to WSL 1!
Check out the WSL 2 PostUpdate in 2020: Now that Microsoft has released the Spring 2020 Windows update we have access to WSL 2 on all editions of Windows 10 (including Home). They even backported in support for WSL 2 in Windows versions 1903 and 1909.
I’ve recorded a video of how I have Docker Desktop along with WSL 2 working together along with other tools that I use.
I’ve decided to keep this post unmodified and fully working for WSL 1 in case you want to continue using it. Just know that I’ve moved on to using WSL 2 and that none of the steps below are necessary to do with WSL 2.
This article expects you to have WSL set up already. If you don’t, I have another article that goes over how to set up an amazing WSL based development environment within Windows. You can even run graphical apps and it doesn’t require a VM.
Onwards we go…
While the Docker daemon cannot run directly on WSL, you can use the Docker CLI to connect to a remote Docker daemon running through Docker for Windows or any other VM you create (this article covers both methods).
If you’re wondering “why not just run docker.exe and docker-compose.exe
from Docker for Windows directly in WSL?”, that’s due to a bug with running
Docker or Docker Compose interactively in that environment. The TL;DR is you
can’t run anything in the foreground with interactive mode, which makes it
unusable for real web development.
But with the Docker CLI configured to the remote Docker for Windows host it’s really awesome! Using this method, very large Rails applications respond in ~100ms (or ~5s when having to compile 10,000+ lines of Javascript and SCSS). That’s with mounted volumes too!
I use this set up pretty much every day for Rails, Flask, Phoenix, Node and Webpack driven apps. It’s very solid in terms of performance and reliability.
# Configure Docker for Windows (Docker Desktop)
In the general settings, you’ll want to expose the daemon without TLS.
Docker for Windows has been recently renamed to Docker Desktop, so if your settings look slightly different than the screenshot, no worries. It’s the same thing.
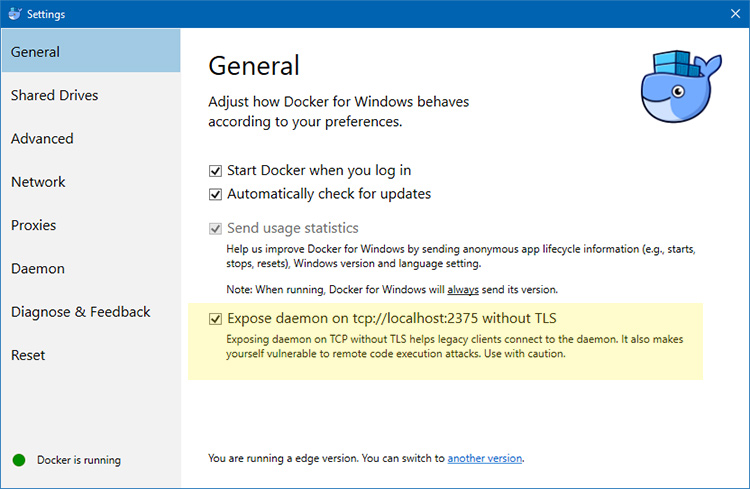
It mentions “use with caution” because any time you make a network connection that’s not encrypted, it’s worth talking about but in this case it’s completely safe because we’re never connecting to it over a public network.
This is going to allow your local WSL instance to connect locally to the
Docker daemon running within Docker for Windows. The traffic isn’t even leaving
your dev box since the daemon is only bound to localhost, so not even other machines
on your local network will be able to connect. In other words, it’s very safe
for this data to be transmit over plain text.
You may also want to share any drives you plan on having your source code reside on. This step isn’t necessary but I keep my code on an internal secondary HD, so I shared my “E” drive too. If you do that, goto the “Shared Drives” setting and enable it.
Can’t use Docker for Windows?
This is only necessary if you are NOT running Docker for Windows!
You’ll want to set up your own VM to run Docker. Docker Tip #73 goes into detail on how to do this, and it even includes links to videos on how to configure the VM.
# Install Docker and Docker Compose within WSL
Everyone can follow along at this point!
We still need to install Docker and Docker Compose inside of WSL because it’ll give us access to both CLI apps. We just won’t bother starting the Docker daemon.
The following instructions are for Ubuntu 18.04 / 20.04, but if you happen to use a different WSL distribution, you can follow Docker’s installation guide for your distro from Docker’s installation docs.
Install Docker
You can copy / paste all of the commands below into your WSL terminal.
Ubuntu 18.04 / 20.04 installation notes taken from Docker’s documentation:
# Update the apt package list.
sudo apt-get update -y

# Install Docker's package dependencies.
sudo apt-get install -y \
    apt-transport-https \
    ca-certificates \
    curl \
    software-properties-common

# Download and add Docker's official public PGP key.
curl -fsSL https://download.docker.com/linux/ubuntu/gpg | sudo apt-key add -

# Verify the fingerprint.
sudo apt-key fingerprint 0EBFCD88

# Add the `stable` channel's Docker upstream repository.
#
# If you want to live on the edge, you can change "stable" below to "test" or
# "nightly". I highly recommend sticking with stable!
sudo add-apt-repository \
   "deb [arch=amd64] https://download.docker.com/linux/ubuntu \
   $(lsb_release -cs) \
   stable"

# Update the apt package list (for the new apt repo).
sudo apt-get update -y

# Install the latest version of Docker CE.
sudo apt-get install -y docker-ce

# Allow your user to access the Docker CLI without needing root access.
sudo usermod -aG docker $USER
At this point you must close your terminal and open a new one so that you can run Docker without sudo. You might as well do it now!
Install Docker Compose
We’re going to install Docker Compose using PIP instead of the pre-compiled binary on GitHub because it runs a little bit faster (both are still Python apps).
# Install Python 3 and PIP.
sudo apt-get install -y python3 python3-pip

# Install Docker Compose into your user's home directory.
pip3 install --user docker-compose
The next step is to make sure $HOME/.local/bin is set on your WSL $PATH.
You can check if it’s already set by running echo $PATH. Depending on what
WSL distro you use, you may or may not see /home/nick/.local/bin
(replace nick with your username).
If it’s there, you’re good to go and can skip to the next section of this post.
If it’s not there, you’ll want to add it to your $PATH. You can do that by
opening up your profile file with nano ~/.profile. Then anywhere in the file,
on a new line, add export PATH="$PATH:$HOME/.local/bin" and save the file.
Finally, run source ~/.profile to active your new $PATH and confirm it
works by running echo $PATH. You should see it there now. Done!
# Configure WSL to Connect to Docker for Windows
The next step is to configure WSL so that it knows how to connect to the remote Docker daemon running in Docker for Windows (remember, it’s listening on port 2375).
If you’re not using Docker for Windows and followed Docker Tip #73’s guide to create your own VM then you probably did this already which means you can skip the command below.
Connect to a remote Docker daemon with this 1 liner:
echo "export DOCKER_HOST=tcp://localhost:2375" >> ~/.bashrc && source ~/.bashrc
That just adds the export line to your .bashrc file so it’s available every
time you open your terminal. The source commands reloads your bash configuration
so you don’t have to open a new terminal right now for it to take effect.
Verify Everything Works
# You should get a bunch of output about your Docker daemon.
# If you get a permission denied error, close + open your terminal and try again.
docker info

# You should get back your Docker Compose version.
docker-compose --version
# Ensure Volume Mounts Work
The last thing we need to do is set things up so that volume mounts work. This tripped me up for a while because check this out…
When using WSL, Docker for Windows expects you to supply your volume paths in a
format that matches this: /c/Users/nick/dev/myapp.
But, WSL doesn’t work like that. Instead, it uses the /mnt/c/Users/nick/dev/myapp
format. Honestly I think Docker should change their path to use /mnt/c because
it’s more clear on what’s going on, but that’s a discussion for another time.
To get things to work for now, you have 2 options. If you’re running Windows
18.03 (Spring 2018) or newer you can configure WSL to mount at / instead of
/mnt and you’re all done. If you’re running 17.09 (Fall 2017) you’ll need to
do something else.
Here’s step by step instructions for both versions of Windows:
Running Windows 10 18.03+ or Newer?
First up, open a WSL terminal because we need to run a few commands.
Create and modify the new WSL configuration file:
sudo nano /etc/wsl.conf

# Now make it look like this and save the file when you're done:
[automount]
root = /
options = "metadata"
We need to set root = / because this will make your drives mounted at /c or
/e instead of /mnt/c or /mnt/e.
The options = "metadata" line is not necessary but it will fix folder and
file permissions on WSL mounts so everything isn’t 777 all the time within the
WSL mounts. I highly recommend you do this!
Once you make those changes, sign out and sign back in to Windows to ensure the
changes take effect. Win + L isn’t enough. You’ll need to do a full blown
sign out / sign in.
If you get an error the next time you start your WSL terminal don’t freak out.
It’s a bug with 18.03 and you can easily fix it. Hit CTRL + Shift + ECS
to open the task manager, goto the “Services” tab, find the “LxssManager” service
and restart it.
This seems to only happen if you sign out of Windows instead of doing a full reboot and will likely be fixed in a future 18.03+ patch.
Once that’s done, you’re all set. You’ll be able to access your mounts and they
will work perfectly with Docker and Docker Compose without any additional
adjustments. For example you’ll be able to use .:/myapp in a docker-compose.yml
file, etc..
What terminal emulator are you using?
If you’re using ConEmu,
then you’ll want to make sure to upgrade to the latest alpha release (at least
18.05.06+ which you can see in the title bar of the settings). It contains a
patched wslbridge.exe file to support a custom WSL root mount point.
The default Ubuntu WSL terminal supports this by default, so you’re all good. I don’t know if other terminals support this yet. Let me know in the comments.
You're all done! You can skip the 17.09 steps below if you followed the above steps.
Running Windows 10 17.09?
First up, open a WSL terminal because we need to run a few commands.
Bind custom mount points to fix Docker for Windows and WSL differences:
sudo mkdir /c
sudo mount --bind /mnt/c /c
You’ll want to repeat those commands for any drives that you shared, such as d
or e, etc..
Verify that it works by running: ls -la /c. You should see the same exact
output as running ls -la /mnt/c because /mnt/c is mounted to /c.
At this point you’re golden. You can use volume mount paths like .:/myapp in
your Docker Compose files and everything will work like normal. That’s awesome
because that format is what native Linux and MacOS users also use.
It’s worth noting that whenever you run a docker-compose up, you’ll want to
make sure you navigate to the /c/Users/nick/dev/myapp location first, otherwise
your volume won’t work. In other words, never access /mnt/c directly.
Technically you could use a symlink instead of a bind mount, but I’ve been burned in the past when it came to using symlinks and having certain tools not work because they failed to follow them correctly. Better safe than sorry here.
However, feel free to use symlinks inside WSL to access your bind mount.
For example my Dev folder lives all the way in
/e/Backup/VMs/workstation/home/nick/Dev and there’s no way in heck I’m going
to always type that when I want to access my development files.
So inside WSL
I created a symlink with ln -s /e/Backup/VMs/workstation/home/nick/Dev ~/Dev
and now I can just type cd ~/Dev to access my files and everything works.
Automatically set up the bind mount:
Unfortunately you will have to run that sudo mount command every time you
open a new terminal because WSL doesn’t support mounting through
/etc/fstab yet (edit: it does in 18.09+, but if you’re using 18.09+ you
should follow the 18.03+ steps).
But we can work around that limitation by just mounting it in your ~/.bashrc
file. This is a little dirty but as far as I know, I think this is the only
way to do it, so if you know of a better way, please let me know.
You can do that with this 1 liner: echo "sudo mount --bind /mnt/c /c" >> ~/.bashrc && source ~/.bashrc
and make sure to repeat the command for any additional drives you shared with
Docker for Windows. By the way, you don’t need to mkdir because we already did it.
Yes I know, that means you will be prompt for your root password every time you open a terminal, but we can get around that too because Linux is cool like that.
Allow your user to bind a mount without a root password:
To do that, run the sudo visudo command.
That should open up nano (a text editor). Goto the bottom of the file and
add this line:
nick ALL=(root) NOPASSWD: /bin/mount, but replace “nick” with your username.
That just allows your user to execute the sudo mount command without having to
supply a password. You can save the file with CTRL + O, confirm and exit with
CTRL + X.
Mission complete. You’re all set to win at life by using Docker for Windows and WSL.
Let me know how it goes in the comments!